Good night!
Sunday, January 16, 2011
More Scarves
Good night!
Friday, January 14, 2011
Skull & Crossbones Skater Scarf
Even though it's not perfect, I think it was a successful experiment and now know what not to do when I make 3 more this weekend for his friends' birthday presents.
- Cut 2 pieces of fleece, each in different colors (one for the back, one for the front), to the size you want your scarf. I used one I already had as a guide.
- Find a picture of a skull with crossbones you like. Size it to fit on your scarf, print it and cut it out. The one I used can be found here.
- REVISION: added step- Iron on some fusible interfacing behind the parts you want to cut out. This makes sewing around the shapes much easier.
- Trace the pieces onto your top piece of fleece near one end of the scarf and cut them out.
- Cut out the nose and eye pieces. (Mine aren't the right size or shape. I'll do better next time.)
- Pin your top piece of fleece to the bottom piece, iron the area with the fusible interfacing sandwiched between, and sew all the way around the edges using at least 1/4 inch allowance.
- This is the tricky part: arrange and pin the cut-out skull and crossbones and carefully sew them down as close to the edge as possible.
- This is the trickier part and why I think I iron-fused the parts the next time: tack the eyes and nose down and carefully sew them down as close to the edge as possible...and then you're done!
Wednesday, January 12, 2011
The Best Bread EVER
2 loaves
6-7 cups all-purpose flour
1/2 cup sugar (or ½ cup honey)
3 ½ t salt
3 pkgs. (2 T.) active dry yeast
¼ cup butter or margarine, softened
2 cups very warm water (120* to 130*)
Place 5 ½ cups flour, sugar or honey, salt, yeast, and butter in mixer bowl. Attach bowl and PowerKnead Spiral Dough Hook to mixer. Turn to Speed 2 and mix about 20 seconds. Gradually add warm water and mix about 1 ½ minutes longer.
Continuing on Speed 2, add remaining flour, ½ cup at a time, and mix about 2 minutes, or until dough starts to clean sides of bowl. Kneed on Speed 2 about 2 minutes longer.
Cover dough with plastic wrap and a towel. Let rest about 20 minutes.
Divide dough in half. Shape each half into a loaf. Place in greased baking pans. Brush each loaf with vegetable oil and cover loosely with plastic wrap. (You can refrigerate dough up to 12 hours.)
When dough has risen to the top of the pan, uncover dough carefully. Bake at 350* until done (it should sound solid when you knock on the top of a loaf). Brush with butter. Remove from pans immediately and cool on wire racks.
About Me
- I'm 31-years-old.
- My husband, A, and I have been married 11 1/2 years.
- I have 3 boys: B is 8 and in 2nd grade, C is 4 and in preschool, and D is almost 2 and gets into everything. Together, they really keep me on my toes.
- I am going to school to get a Paralegal degree and am planning on graduating in 2012. However, being the crazy person I am, I'm seriously considering adding a Marketing degree which will push graduation out another 2-4 years (depending on how much time I want to devote to it).
- My favorite classes so far have been Psychology and Logic. I did not enjoy Criminal or Property Law. The class I am most excited about this semester is Digital Photography.
- I have a tattoo of a frog on my ankle. It's not colored in, though, because that would have hurt too much.
- In my spare time, I enjoy reading (especially a good mystery), watching movies (no horror), sewing, making jewelry, and exercising if I don't have to worry about constant interruptions.
- I am the oldest child in my family.
- I despise playing most sports and am not an outdoorsy person, but I love the sun and playing in the water.
- I hate the cold. So what am I doing in Minnesota??? Good question! The truth is, we want our kids to grow up with grandparents and cousins. It's totally worth freezing our patooties off for a few months a year.
- I enjoy most kinds if music and will happily skip off to a concert whenever our schedule and finances permit.
- I played the flute in my high school marching band and taught piano lessons for a few years.
- I hate jigsaw puzzles but love Sudoku.
- Shoes make me happy. My favorite pair is red patent leather 3-inch heels. Beautiful!!
- I spend most days in my pajamas if I don't have to go anywhere, especially in the winter. Why trade my favorite fleece pants if I don't have to?
- My favorite color is blue. Green and red follow closely behind.
- I wore braces twice.
- I broke my ankle by stepping off the curb wrong when I was 6 months pregnant with our 2nd son, leaving me on crutches for the remainder of my pregnancy and a boot for a month after. NOT fun.
- I went by my middle name for 3 years because I hated my first name (too many jokes).
- Baking is way more fun than cooking.
- I love pasta and cheese. Any kind of pasta and cheese. All kinds of pasta and cheese.
- I don't eat red meat. Ever.
- Bananas are gross.
- I think cheesecake is the most perfect food. That, and avocados.
- I love doing laundry but hate putting it away.
- Cleaning the toilets is my least favorite job, but with 3 boys I end up doing it a lot.
I hope you have a beautiful day.
Charity
Sunday, January 9, 2011
What's for Dinner: Potato Corn Chowder
This is a favorite of the whole family, and with a house full of picky eaters that is saying a lot!
INGREDIENTS
- 3 cups milk (I use skim)
- 1 can cream of chicken soup
- 2 cups frozen Southern hash brown potatoes (the diced ones, not grated, although those would probably be fine)
- 1 cup frozen corn
- 1 cup shredded cheddar cheese
- 1 can chicken or 1 cup cooked and chopped chicken (optional)
- onion, salt and pepper to taste (optional)
- bacon bits (optional)
DIRECTIONS
- Combine milk, soup, corn, onions and potatoes in a large pot and bring to boil on high.
- Reduce temp to medium low for about 10 minutes, stirring frequently, until potatoes are soft.
- Season with salt and pepper.
- Stir in cheese.
- Serve and top with bacon bits and extra cheese if desired.
This is great served with a crusty bread or rolls.
Saturday, January 8, 2011
What's for Dinner: Penne with Pumpkin Cream Sauce
Penne with Pumpkin Cream Sauce
- Servings: 4
- Cook Time: 15 Minutes
- Prep Time: 15 Minutes
Ingredients
- 1 jar (15 oz.) Classico® Light Creamy Alfredo Pasta Sauce
- 1 pound(s) penne pasta
- 2 tablespoon(s) butter
- 1 onion, chopped
- 1 jar 15-ounce pure pumpkin puree
Directions
1. In a large pot of boiling, salted water, cook the pasta until al dente. Drain pasta and keep warm.2. In a large pot, melt the butter over medium-low heat. Add the onion and season with salt and pepper; cookuntil softened, about 6 minutes. Stir in the pumpkin and Alfredo sauce. Add some water to get a desired consistency. Heat until all ingredients are heated through.
3. Serve over warm pasta. Top with parmesan and parsley.
Friday, January 7, 2011
Little Boy Book Bag
I had planned to do a lining but time was short and I figured it really didn't matter that much since the fabric I used was denim-like and pretty heavy. I serged all the edges so nothing would fray. For the handles, I lined them up with the top of the bag before I folded it over twice, and then double-stitched around the top to make sure the handles are secure. This sucker is made to last! =)
For Christmas, I filled his bag with new board books that I had picked up at the dollar store, the dollar section at Target (love that place!), and on sale at Borders. It was a hit! Whenever we go out, I toss in a few books, some cars, a sippy cup and diaper, and we're ready to go. The bag is big enough to hold all the necessities, yet small enough that D can carry it around and pull stuff out while riding in the car or shopping cart.
Thursday, January 6, 2011
Let it Snow Earrings
All of these pretty little things are for sale in my Etsy shop,
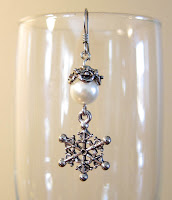
along with other nickel-free earrings:
http://www.etsy.com/shop/cheruba2
Please forgive my photographing skills. I know they leave a lot to be desired. Hopefully, the digitally photography class I'll be starting next week (yikes!) will help a ton. Have a beautiful day!
Wednesday, January 5, 2011
I got the best e-mail today!
Tuesday, January 4, 2011
Sumo's Sweet Stuff- a favorite!
Monday, January 3, 2011
Snake cake
Snake scarf
I didn't take pictures while I was making it since I pretty much winged the whole project, but I'll describe how I did it.
MATERIALS
- 2 pieces of fleece for the body, roughly 4-5 feet long (depending on how long you want it) and 1 foot wide
- 1 scrap piece of red fleece for the tongue
- 8 coordinating buttons for the eyes (4 should be larger than the other 4)
- 3 jingle bells for the tail
- embroidery floss to sew the buttons on
- Using a scarf that you like as a guide to determine the length and width, make a pattern on paper. The head will be wider than the regular scarf and the tail should be tapered.
- Layer the two colors of fleece you would like to use and pin the pattern on top of both pieces of fleece. Of course, you could cut the pieces out separately, but I like to get things done quickly. =) NOTE: If you feel your fleece has a wrong or right side, put the right sides together.
- Cut out the tongue. We serged 2 pieces of fleece together but it doesn't looks as finished as I'd like, so I will have to think about how to do it better. Maybe I'll just use a single piece of fleece and sew down the middle and into the fork for reinforcement.
- Place the tongue inside the mouth, facing inward, so only the very edge peaks out to be sewn into the snake.
- Pin around the outside of your cut-out snake, leaving an opening somewhere along the straight side of the body large enough to put your hand through so you can pull it right-side out.
- Sew around the outside of the snake, except for the designated opening. I used the serger so the inside seam wouldn't be bulky, but a straight stitch would be fine.
- Turn the snake right-side out, drop the jingle bells into the tail, run your finger along the inside seams to make sure they are pushed out all the way, and then pin all the way around the outside to keep them in place. Be sure to pin the opening shut.
- Sew around the entire outside of the snake. When you get to the tail, leave one bell in the tip and sew around it. Then, you'll have to sew the other two bells into their own row. I'm sorry I don't know how to explain it better, but you can look at the picture to see what I mean.
- For the eyes, put each of the smaller buttons on top of the larger buttons and line them up so you can sew them on all together on both sides of the snake. Sew them on nice and tight with the embroidery floss so they can't be pulled off, the you're done!
I hope this makes sense. Feel free to contact me if you have questions or need clarification. Happy sewing!